You can add and edit images to your eSkript. Once uploaded, images are stored in your ‘Media‘ library you can access over the left sidebar menu. To upload a new image (or other media file) you have three possibilities.
Upload an image via the Media Library
- Go to your media library (left sidebar menu) and click on the ‘Add New‘ button.
- Click on ‘Select Files‘ or drag and drop your files in the indicated area.
Upload an image with the Add Media button
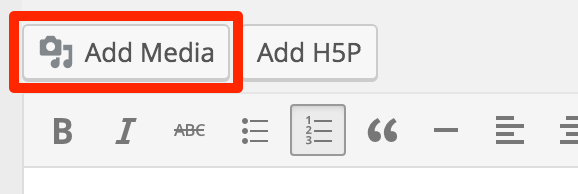
- Click on the ‘Add Media‘ button above the toolbar.
- Click on ‘Select Files‘ or drag and drop your files in the indicated area.
Upload media while writing
Upload an image directly in the Editor
- Drag & drop your image file into the Editor’s area.
Edit Images
When the upload is completed, click on the image to add or change the following information:
- Title
- Caption (Give your photo a caption. Photos without captions will not render properly in all e-readers.)
- Alt Text (It’s best practice to write an alternatice text, which will be read to visually impaired readers by a screen reader or accessibility device.)
- Description
Furthermore, you can click on the respective link to either:
- View attachment page
- Edit more details (Read the official PressBooks user guide chapter for more information: Image Editing.) or
- Delete permanently
Insert Images
If you want to insert one or more individual images click on the ‘Add Media‘ button above the toolbar while writing. The ‘Insert Media’ screen will open. Select one (or more images while holding the ‘SHIFT’ key). Enter the required attachment details and display settings and click on ‘Insert into post‘.

Enter attachment details and display settings
You can always go back and update the information and alignment of an inserted image. Therefore click on the inserted image and click on the icons of the pop-up toolbar.
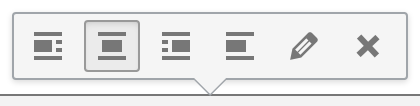
Pop-up menu to align, edit or delete an inserted image
It is best to insert an image in ‘Full Size’ and adapt its size in the editor. The smaller images provided by WordPress have lesser quality.
If you have a greater amount of images you want to insert you can create a gallery. Therefore click on ‘Add Media‘ and then switch to ‘Create Gallery‘ on the left side.
Images & Best Practices
For more information on how to handle images in PressBooks refer to the official user guide and the chapter
FAQs
Why are my images out of focus?
Insert your images in ‘Full Size’
- Click on the image
- Click on the pencil to edit
- At ‘Size’, choose ‘Full Size’
- Click the ‘Update’ button
If needed, change the image size by hand in the editor.