9.1 – Preparation
This chapter assumes you have already contacted us for working with nbgitpuller and a git repository is already set up and linked to your JupyterHub. This chapter will use a repository hosted on ETH’s internal GitLab for its examples, but this workflow also works with any other host (such as GitHub), although naturally the interface will look a bit different.
Organising the Repository
It is recommended that you organise your repository with any future changes in mind. This means putting your files into folders from the very beginning, such as one folder for each assignment to be submitted. For assignments especially, this can save you and your students some headaches as Moodle only allows for submitting entire folders from Jupyter workspaces, not individual files.
Please also read how to separate data from submission files concerning a good directory structure for submissions.
9.2 – Creating Assignments
This works just like any other assignment using Jupyter Notebooks, but there are some settings you should watch out for.
At the top of your Moodle course page, turn editing on.

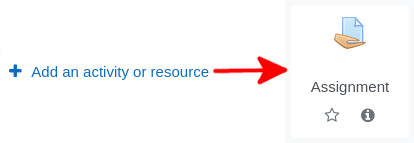
Next, click “Add an activity or resource” in a preferred location in your course, and choose “Assignment”.
Name your assignment and set any deadlines as you need them. In the submenu “Submission Types”, tick only Jupyter Notebooks. By default, file submissions are also possible; it is recommended you turn this option off so your students really have to submit something from their Jupyter workspace.
Important: Once you tick Jupyter Notebooks in “Submission Types”, you’ll be able to select a folder to create the assignment with. Do not choose anything, and instead leave that field blank. Any files your students will need are already provided by git.
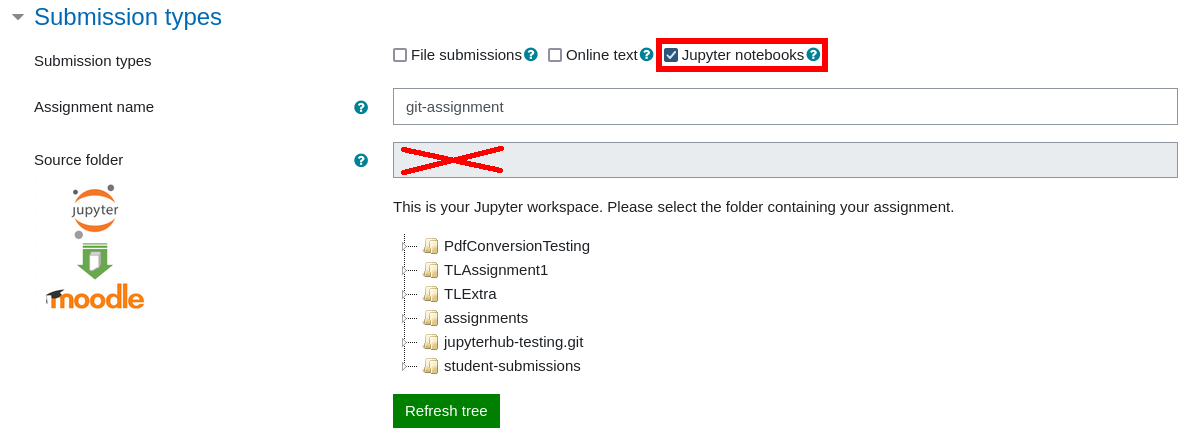
If you have clicked the link to JupyterHub at least once since the git repository was linked to it, you should also be able to see your repository show up in its own folder (ending in .git).
If you want to be able to give feedback using Jupyter Notebooks, the necessary settings are the same as when creating a regular assignment using JupyterHub.
Finally, keep in mind, in case you want to add (Jupyter Notebook) files directly to the assignment, follow the instructions in the previous chapter. Jupyter Notebooks added, e.g., as additional files will not be copied properly to JupytertHub with the button “get a copy of the assignment”.
Changing Assigment Files
In regular assignments using JupyterHub, changing the files used for the assignment after creating it is not possible, and you would have to delete and then recreate it.
However, with this linked git repository, you can simply make any changes in the repository itself, and the files will update for your students the next time they load their Jupyter workspace, even when the assignment is already ongoing.