Using a git repository with JupyterHub can be a great option if you want to regularly provide your students with additional files, such as during a weekly lecture, or expect files needed for assignments to change often. For this chapter, it is assumed that you are already familiar with version control systems like git and know how to set up a repository for yourself.
Security Warning
Access to a git repository is always universal, there is no way to restrict access to certain files or directories. Access credentials are stored in <cloned_repo>/.git/config and can be copied and used elsehwhere, giving access to all branches, If your repository contains sensitive data, consider a separate repository for use with JupyterHub.
3.1 – What You Will Need
- A git repository hosted on a server, such as the ETH-internal GitLab or the public GitHub.
- The link to the repository you want to use.
- Which branch of the repository should be used.
- Optionally, a file that should be opened automatically on entering JupyterHub.
- If your repository is private, an access token with read permissions.
3.2 – How It Works
The whole process works using a plugin known as nbgitpuller. Every time your students click the Moodle link to their Jupyter workspace, nbgitpuller will synchronise it with the git repository you have linked. Any changes the students have made to their own workspaces and/or files will be preserved, so it is safe to update a notebook even mid-lecture. The plugin uses a specialised set of merging rules to achieve this, which you can read more about here.
This way, you can be sure that all your students will have the most recent version of whatever files you want them to have. However, nbgitpuller will only check for changes in the git repository whenever the Moodle link to JupyterHub is clicked, not while a student is actively working in their workspace. If you decide to correct an error or add a new file mid-lecture, be sure to have each of your students click the link again to download the changes.
Pushing Changes Back to the Repository
nbgitpuller does not provide a way to push changes you've made back to the remote repository. This is by design, as the plugin is intended only for pulling from repositories, but not for pushing to them. Treat the directory managed by nbgitpuller as a read-only resource,
If you want to use your repository directly from within Jupyter to develop your course, read more about this in the following chapter.
3.3 – Preparing the Repository
It is recommended that you set up your repository in a way that makes it easy to tell which files belong to which assignment/lecture. An easy way to do this would be using a new folder for each new component of your course. Make your changes to the repository, upload what files you or your students will need, and take note of the url to the repository and the branch you intend to use. In the image below, we'll use GitLab as an example.
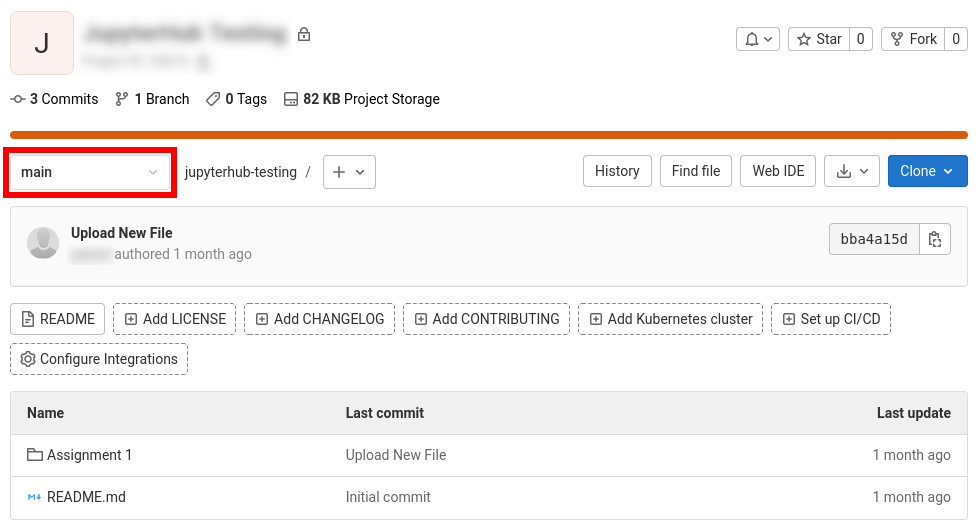
The current branch is highlighted in the above picture. By default, this will be the "main" branch, or "master" for older repositories.
With all this information ready, you're almost good to go. If your repository is private (i.e., not accessible to the broad public), you'll need to create an access token by following the steps below.
Token Lifetime
A token has a limited lifetime, enforced by the git hoster. When the token has expired, the Jupyter notebooks connected to the git repository will fail to launch. Git stores the access token locally, and will always use this token, regardless of a newer token configured in Moodle.
You may create a new token and contact Jupyter support (see below), who will replace the token in Moodle and in the local repositories in the home directories of the course participants.
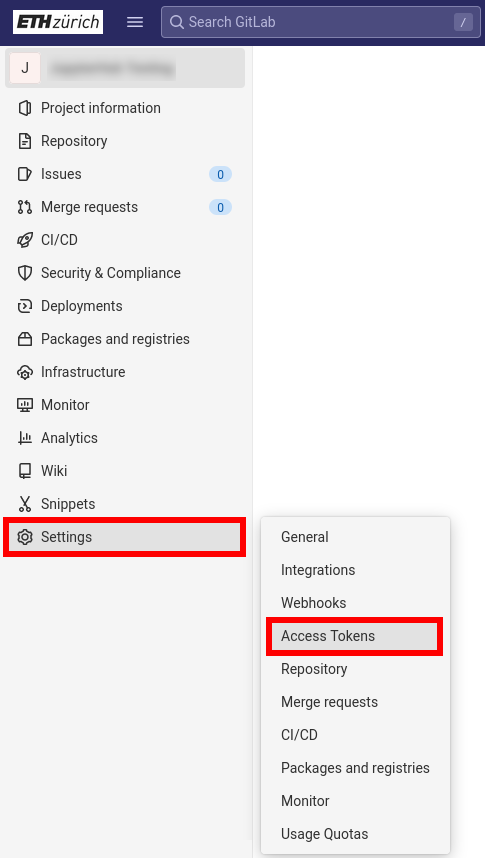
3.4 – Creating an Access Token in GitLab
In GitLab, create a new access token by navigating to your project's "Settings" [latex]\to[/latex] "Access Tokens".
Choose a descriptive name for your access token so you'll remember what you created it for in the future. If you give it an expiration date, set it to a point in time beyond whatever is the latest date you expect your students to interact with your course. Otherwise, if the token expires while your students are still trying to sync their Jupyter workspace with your repository, you'll have to create a new one. The two crucial settings are role and scope. "Reporter" allows the token to see the repository, but not make any changes, which is enough for our purposes. The role "Guest" is not sufficient! Then, make sure you tick the "read_repository" permission and click "Create project access token".
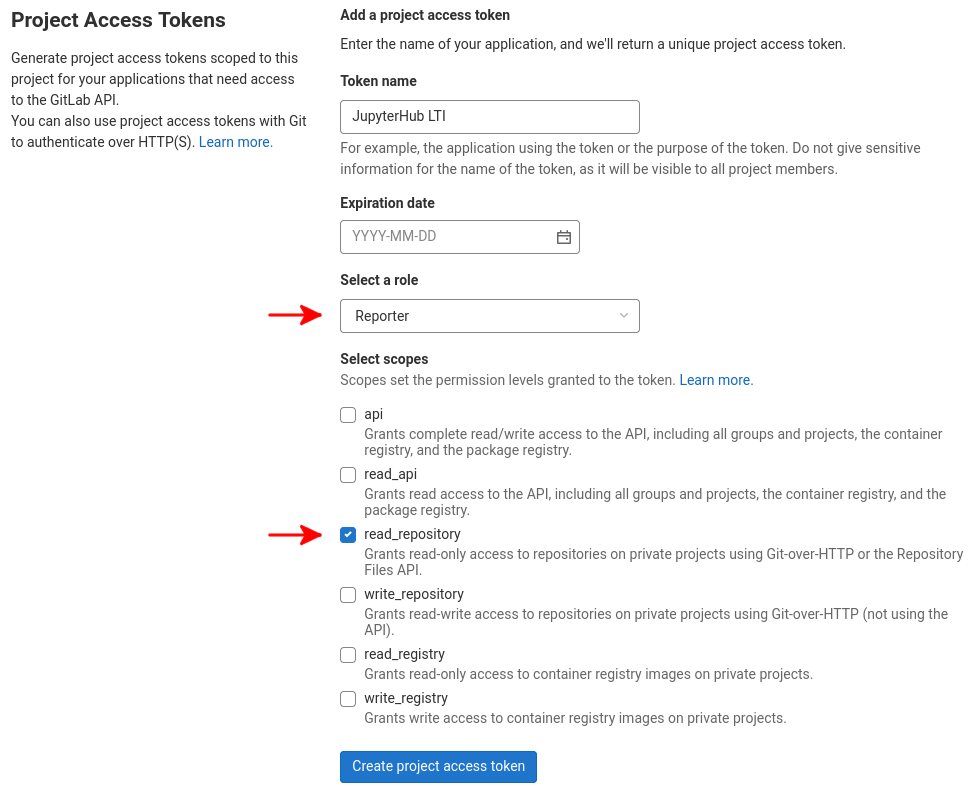
The page will reload and display a long string of letters and numbers: your newly created token. Make sure you leave this GitLab page open, as you will not be able to view the token again once you close the page. You should now have everything ready to contact us for setting up nbgitpuller.
3.5 – Creating an Access Token on GitHub
Access tokens on GitHub are different in that, traditionally, they grant access across all owned repositories with no option to limit the scope. For a use case like this one, this would be undesirable. However, GitHub is currently beta testing a new feature called Fine-Grained Tokens, an erstwhile documentation can be found here.
If you create a Fine-Grained Access Token, you can select the repository to which you want to grat read-access under "Only select repositories". Under "Permissions", make sure to grant "Read-only" access to "Contents" of your repository. Selecting "Metadata" for "Read-only" access is mandatory and the default setting.
3.6 – Contacting UTL/EduIT
Send us an e-mail to jupyterhub@ethz.ch with the above information and let us know you'd like to have nbgitpuller set up for your JupyterHub environment. If your course has not previously used JupyterHub, you should also include some additional information we'll need for the first time setup as described here.