Connected to Jupyter Notebook assignments in Moodle, we also offer an automated grading service based on Otter Grader. All necessary installations related to Otter Grader are already present in the standard UTL/EduIT JupyterHubs. Please also refer to the documentation for examples (use, e.g., tutorial.zip) and more details on how to prepare your Notebooks for autograding.
Notebook Preparation
First, a master notebook is prepared, which contains questions and possible solutions, as well as code to test and grade the questions. If you use the aforementioned tutorial, demo.ipynb is an example of a master notebook. A standard command-line invocation of Otter Grader (otter assign *.ipynb dist) is used to split the master notebook into two parts:
1. A student’s notebook without solutions and grading information. If not marked as hidden, test code can still be still present, for self-assessment.
2. A ZIP archive with information necessary to grade the solution code (grading archive).
The command also creates a new directory, dist, which contains both parts. The resulting directory hierarchy in the filesystem will be:

Creating an Assignment with Autograding
- Create a new assignment in Moodle and choose the submission and feedback types as “Jupyter Notebooks”.
- For the directory containing your files, choose the newly created directory
dist, which contains both student and grading directories. The presence of the grading archive ZIP will automatically trigger the autograding settings. This means the directory will be split into the student directory, which is zipped and saved as it would be done with a standard assignment. From the autograder directory, the grading archive ZIP file will be stored for the autograding process. There may only be one autograder archive in an assignment. - Under “Grade”, choose the “Grading method” as the advanced grading method “Marking guide”.
- Choose a maximum grade, depending on your assignment (e.g., score 5).
- Save the new assignment.
Once your assignment is set up, you need to define which part of your maximum grade comes from autograding and which part from manual grading:
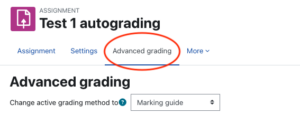
- Go to “Advanced Grading” for your assignment.

- Choose “Define new grading form from scratch”.
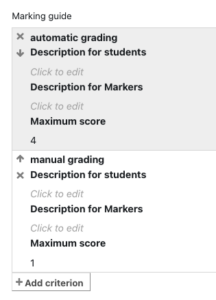
- Add marking criteria for automatic and manual marking and specify scores, e.g.:
- First marking: “Automatic grading”, e.g., score 4.
- Click “+ Add criterion” to add the second marking: “Manual grading”, e.g., score 1.

- Save the settings.
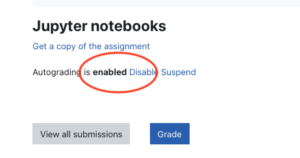
If you view your new assignment, you will now see autograding enabled for this assignment. You will have the option to disable or suspend autograding.

With autograding enabled, any submission from a student will be automatically sent to the autograders. The teachers will see in the submission view list in Moodle a submission with the grading job marked as “Grading in process”. This will only be for a short time until the grades are returned to Moodle from the autograder. Then the submission status will show “Grading status: Graded”.
An Otter Grader run produces a computer-readable results file (JSON) and a PDF rendering of the notebook. Both files are available to the teacher after the grading run in the assignment submissions overview. The JSON will be analyzed, and the grading score will be integrated into the Moodle grading environment. Manual grading (e.g., by PDF inspection) adds an additional score. The final score is the sum of automatic and manual grading.
It is also possible to manually start a new grading run for all submitted (and previously graded) assignments, since there may be situations when the grading archive has to be updated, i.e., changes in scoring. After an update to the grading archive stored in Moodle, subsequently triggering grading runs for all notebooks already submitted is required. Subsequent grading runs overwrite the results from the automated grading stored in Moodle, and only one automatic score per submission may be present. The scores from manual grading are not changed.

Under your new assignment,

you can now also see the grade breakdown into the elements you defined in your marking guide, e.g., automatic and manual grading. If you go to the submissions overview by choosing “View all submissions”, you will find an overview of all files and information associated with the assignment submissions, i.e., students’ submissions, grading results, grades, feedback (if applicable), and others.

The inclusion of the Jupyter grading scores into the standard Moodle grading environment allows for the use of the standard CSV download function.